Table of Contents
1. Check to see if the Martindale abrasion tester and pilling tester machine meet the customer’s test requirements; if not, you’ll have to purchase the scrap iron back.
The common international test standards are:
ISO 12945-2-2020, ISO 12947-2-2016, ISO 12947-1-1998, ISO 12947-3-1998, ISO 12947-4-1998, GB/T 21196.1-2007, GB/T 21196.2-2007, GB/T 21196.3-2007, GB/T 21196.4-2007, GB/T 4802.2-2008, BS EN 530-2010, ASTM D4970/4970M-22, ASTM D 4966-22;BS EN 388-2016+A1-2018, SATRATM 31 A/B, PUMA, BS EN 16094-2012, ISO 20344-2021, Item 6.12,BS EN 13520-2002, ISO 5470-2-2021

2. Check whether the Martindale abrasion and pilling tester machine has more than one friction head (generally 4, 6, 9), this point also needs to be considered, after all, more than one friction head relative cost will certainly rise, and this should be based on the actual needs of the company, the more friction head, the higher the test efficiency.

3. Check the stability, this is very important for the enterprise, conventional testing is generally carried out over a longer period of time if the test company uses the Martindale abrasion and pilling tester machine frequently, and there is no stability guarantee, the consequences can be imagined, so the manufacturer needs to show how many tests the Martindale abrasion and pilling tester machine has done before leaving the factory, as well as the corresponding evidence; or try out the instrument before the order is paid.

4. After-sales completion, service timeliness, and other issues, it is best to test the strength of the factory, as well as advance understanding of after-sales service attitude and after-sales service capabilities.

5. A comprehensive comparison of the overall strength of the manufacturer, such as the Martindale abrasion and pilling tester machine details configuration, parameters, etc., and strive to purchase to cost-effective, high-configuration, high-performance machine.
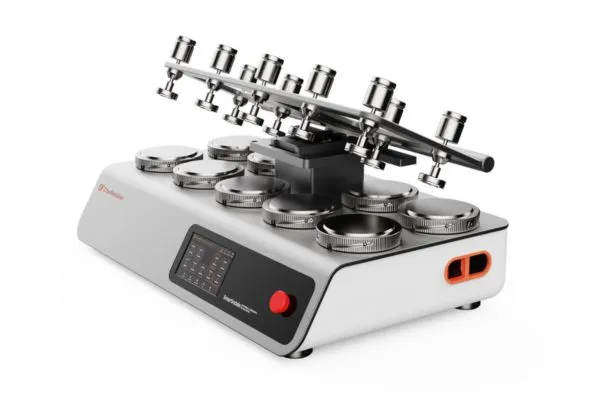
Currently, on the market, the ChiuVention Smartindale Abrasion Tester is very popular for the following reasons:
It is a Smart Martindale Abrasion Tester of a new generation, which was developed by ChiuVention.
It completely overturns the traditional testing model.

The Features of Smartindale
The original digital drive achieves a higher level of test accuracy
Smartindale abrasion and pilling tester machine replaced the traditional analog drive with a digital drive, an exclusive innovation in the industry, the combination of dual servo motors, microcontroller, embedded, mathematical model, point-to-point drive, and so on, single point generated LISSAJOUS, with higher precision and equipment solidity.
Unique calibration-free function
The dual action of the servo drive and position sensor allows the instrument to do accurate testing continuously.
Smart instruments, IOT function
It can be networked with smart devices like Phone, Tablet, etc. It can set parameters on the phone, and monitor the test status. With one click, it will provide equipment warning reminders, supplies replenishment reminders, and so on test status.

Test modes can be switched by one-touch
There is no need to change pins or do direct on-screen switching to get many test modes (e.g. straight line mode, large trajectory mode, small trajectory mode).
Humanized design, safer guarantee
The lifting arm beam and moving guide plate may be operated with one hand and automatically closed, anti-collision, and tester-friendly.

Precision manufacturing, stable operation
The fixture rotates flexibly. Here the grinding table and specimen fixture are highly parallel. The m/c has a small run-out with the surface of the grinding table (less than 0.05mm). It is more conducive to obtaining reliable test results.

Mahedi Hasan working as an Executive (Fabric Marketing) at Pengnuo Group. Graduated with B.Sc. in Textile Engineering. Before was a Top Rated content writer at Upwork, and Level 02 Seller at Fiverr, Level 02 Publisher at Ezoic. Very passionate about content writing, SEO practice, and fashion website designing. Highly Experienced fashion writer for the last 4+ years. Have extensive 7 years of experience in the wholesale clothing business.
